
Welcome to Part Two.
Needle Weaving, in the Round, on a Circular Knifty Knitter Loom.
Here you will get started on the needle weaving portion of the process.

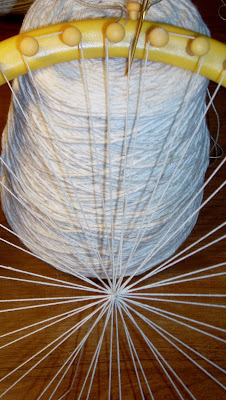
The intent of this tutorial is to get you to the point pictured above. This will get you through the first few rounds of needle weaving, which will help to even out and unify the warp threads. And then it will progress through the process of thread changes.

Below is where we left off in Part One.

But first, as a reminder: For the purpose of getting started, pull from what you likely already have on hand. Pictured below is cotton crochet thread for the warp. And for the next two rounds of weaving find something heavier, like a cotton yarn, and then maybe a handspun or fashion/novelty yarn. Choose fibers with different textures.

If all you need is a picture, click on the photo above for a Slide Show.
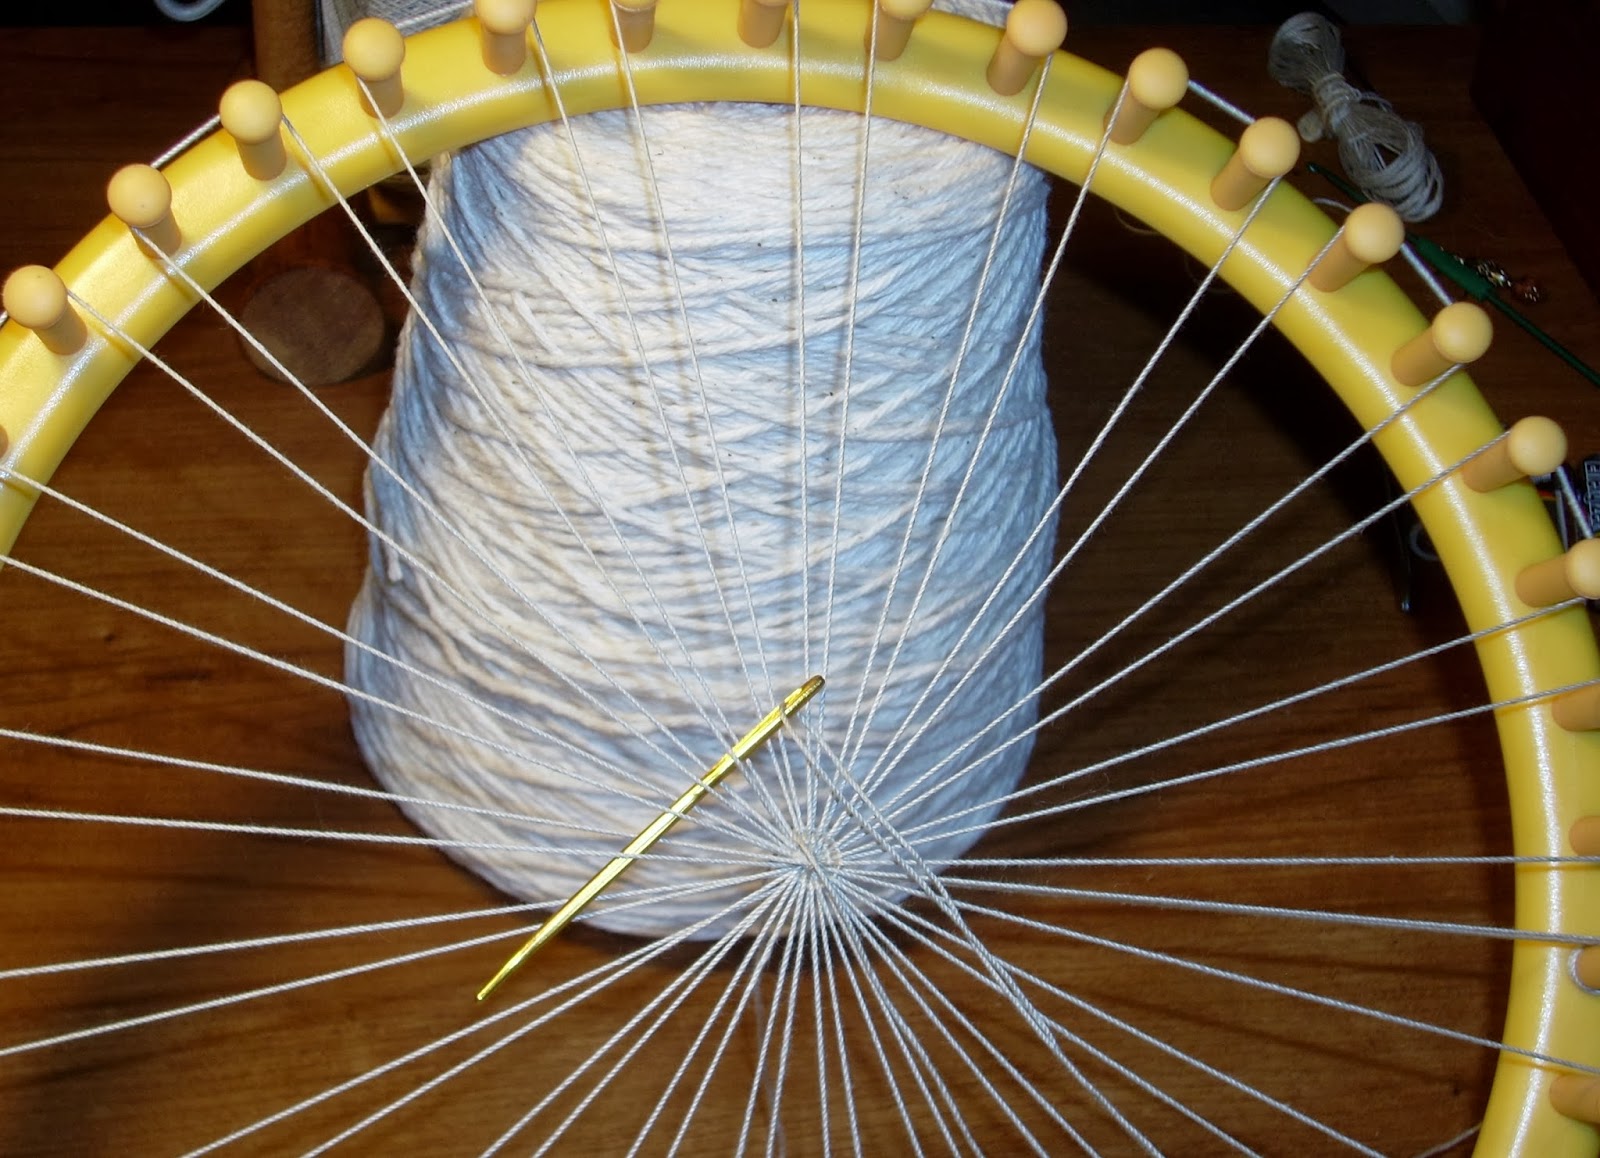
Pull your threaded needle up from behind the loom, to the right of your Tie On and Tie Off threads.
Below is a close up of the Center Knot.

With your needle start under the Tie On/Tie Off threads, and then over the next thread; under the next, etc. Simply repeating the over and under motion, for the next few sets of warp threads and then pull your needle through.
Pull taught, in a curved motion; working the Weft Thread down as close to the knot as possible.
Use the point of your needle to help to pull the weft toward the center.
SPECIAL NOTE: This is why you want to use a blunt needle.

Begin the process all over, making sure you need to either go over or under the next Warp Thread.

At this point, you will find it helpful to rotate the loom as you progress around your weaving.

Below is a close up of how the first round will appear.
.jpg)
Pulling a loaded needle toward the center knot will help you to see how you are progressing.

As you make your way around, back to where you started, your next round should begin with your needle passing over the Tie On/Tie Off threads.
See below for a close up:

As stated earlier, periodically pulling your needle toward the Center Knot, will help you to see that you are maintaining the proper over and under course.
As you pull taught in subsequent rounds [See below], it is helpful to leave a bit of an arch of Weft Thread. And you will get the feel for just how much to leave based on the thread being used, and the round that you are on.
These first couple of rounds, though, will need to be as taught as possible in order to help flatten out, and create a more unified set of Warp Threads. This will become clearer as you progress with your second round.

Below is a close up of the next round.

Pictured below is the completion of five rounds.
End with dropping your needle down, to the right of, and behind your Tie On/Tie Off Threads.

Turn over the loom.

Loosely tie together the beginning and ending threads.

You are now ready to change out to a different Weft Thread.

Working with the fiber that you have chosen for the second round of weaving, cut a length long enough for another five rounds.

Bring your new Weft Thread up from behind, and to the right of the next stitch that you will go over.

Then proceed picking up your Warp Threads, under, over, under, etc., pulling your needle toward your weaving to make sure you are starting off and progressing correctly.
[See below.]

A close up of the new round of fiber laid in place.

Here is where you will want to modify how much of an arch you work with as you pull your Weft Thread through and around.

A close up of progressive rounds.

Below is an example of how the cotton yarn is coming untwisted.
When this happens just pull up on your thread, work a bit of twist back in, and then continue to lay it in place.

SPECIAL NOTE: As you reach this point in your weaving,
you should be able to see why you wanted to make sure
you were working with an uneven amount of Warp Threads.
Below is the completion of three rounds, where the weft thread ends and is pulled down to the left [over] the Tie On/Tie Off threads.

Turn over the loom.
Here you can either tie another loose knot, or simply secure your end threads with a small hair clip.
[Very useful when you start a new round and/or work with fibers/threads that may be a little more slippery.]

You are now ready to work with your handspun or novelty yarn.
SPECIAL NOTE: If this is your first time weaving, for the sake of learning,
you might want to start with a commercial yarn. It is your choice.

As you pull up your needle and weft thread from behind, make sure your needle starts over or under the next warp thread.

A close up of the new round of fiber.

A close up of the needle pulled toward the weaving for a period check; making sure you are picking up the warp threads correctly.

When working with a loftier/hairy/fuzzy yarn, it is helpful to keep it looped around your thumb [or in some manner], so that the fibers do not snag, and keep it pulling smooth.

A close up of progressive rounds.

Below is the completion of eight rounds of weaving.

A close up of the completed rounds for this tutorial.

Turn over the loom, and tie off loosely.

A close up of the back side of your weaving.

This is a good place to stop; for now.

Part Three [to be up shortly] will show how to lay in and secure a round of beads.
.jpg)
Part Three ~~ Laying in the Pearls, will be up shortly.

__________________________________________
Leave any questions that you may have in the Comments.
Upcoming posts will include how to lay in and secure a strand of beads, as well as how to bind your finished weaving off of the loom.
Bye for now, and Blessings~

That is just beautiful and looks so tidious(sorry if it's spelled wrong) but simply amazing. When you're done with the weaving though, is it like a pot holder or just a piece of brilliant art to put in a frame? :D
ReplyDeleteHeartsong Studio: Needle Weaving On A Circular Loom >>>>> Download Now
Delete>>>>> Download Full
Heartsong Studio: Needle Weaving On A Circular Loom >>>>> Download LINK
>>>>> Download Now
Heartsong Studio: Needle Weaving On A Circular Loom >>>>> Download Full
>>>>> Download LINK I2
Hi Ashley! Thank you so much. As regards the weaving that I recently posted on Facebook, the funny thing is, I had no intention weaving this piece. All I had intended was to try a doubled up version of warp. The cone of Lily's Sugar N' Cream cotton yarn was handy, so I simply used it to play. But it was also important to get the center knot tied and that lead to further weaving.... I could go on, but suffice it to say, Yes! You are correct. Some of this can be rather tedious. Other aspects not so much. And while I do see utilitarian usage for this type of weaving, the piece in this tutorial, as well as the one just shared on Facebook, is slated for a wall hanging. Thank you again.
ReplyDeleteBlessings~
Laura
I like it!
ReplyDeleteHello, Glenda!!! Welcome to my little niche of the www. (~: Let me know if there is ever anything I can be of more help with. I'm working on more projects. And I hope to have a new post up by the end of the month.
DeleteBlessings, Laura
I love your tutorials but how do I keep my project from curling up after pulling it off the loom I have tried everything and it always curls up and won't lay flat
ReplyDeleteHeartsong Studio: Needle Weaving On A Circular Loom >>>>> Download Now
ReplyDelete>>>>> Download Full
Heartsong Studio: Needle Weaving On A Circular Loom >>>>> Download LINK
>>>>> Download Now
Heartsong Studio: Needle Weaving On A Circular Loom >>>>> Download Full
>>>>> Download LINK