

While I wait for my copy of PLY Magazine's COTTON ISSUE, I'll tell you what I've been doing regarding my own learning experiences with this ancient and valuable fiber.
When the topic of Cotton comes up, it is not that hard to discern. Spinners either love or they hate to spin Cotton. I have commented a time or three in Facebook fiber groups that, 'If you have penchant for overspinning, then Cotton is your fiber.' (~: I've also come to learn one's like or dislike may well have to do with how the fiber is processed.

Working with it raw, from seed to spindle, is considerably different than spinning from a mill processed roving or top. Maybe not ALL processed roving or top; but--- I've experienced the difference between broken and shortened fibers, juxtaposed to picking out the seed by hand, and then carding a much longer staple.
It also needs to be said that finding the right wheel or spindle upon which to spin any given fiber can, at times, be more a matter of the Heart, than of the Head. And working with the wrong tool can be discouraging.
While there is much for me to learn and perfect, I've become quite fond of certain techniques and tools I discovered over the last few years, and I look forward to spinning much more Cotton.
My study of cotton began with a video on spinning commercially packaged Cotton Balls [from the beauty/cosmetics department] on a spinning wheel. I don't seem to be able to find the video any longer. But, it was shared in the Fiber Artists and Yarn Spinners group, on Facebook, when the group was first organized, and several Spinners tried their hand at it. It was NOT as easy as the video spinner made it look. I tried and failed. Miserably.
NOTE: If anyone knows where the video is--- please share.
Since my return to the world of fiber, after being away from it for decades, I watched a number of the videos on YouTube on the preparation and spinning of Cotton. And, I will it repeat here---- Thank God for YouTube. I was most grateful for finding such a visual way to learn, when I am not able to get out and about like I once did.
 My next real experience with cotton was lightly hand carding some raw mill-ginned cotton into Clouds, and then blending it with a Merino/Silk Top into a textured yarn. It was my first attempt at creating an Art Yarn. Though it was a more unorthodox spinning [and I clearly needed more practice in the spinning of Art Yarns], I LOVED it; dubbing the skein: Torn Denim. It also became the first bit of my own handspun used in my first Circle Weaving. My Blessings Shield. I used a small bottom whorl spindle, and then plied it using my Little Meggie Kick Spindle [Heavenly Handspinning]. Even the spindles I chose were unorthodox.
I then tried spinning from a commercially processed roving. I made it work; but--- I wouldn't call it traditionally spun. I was never able to get a full and true long draw. It was only after reading one of Jennifer Beamer's Expertly Dyed: Art by Science posts regarding her own fiber study:
"Carding cotton top into punis and spinning them is, so far, the easiest and fastest way I've spun cotton."
 that I took what was left of my small amount of roving, and carded it. Once in a small hand-rolled puni, I then spun it on a small bottom whorl support spindle. Yes! It did work. And so much better. And it spun the way I knew it was supposed to; but--- not quite.
Time passed. Frustration set in. But, there were other fibers to play with, and occupy my time. And there were numerous Creative Endeavors to get me wonderfully side-tracked. That is until I came across a charming little DVD; which set me on a mission to find out more about the Ginning of Cotton; leading me to the discoveries of methods that Mr. Whitney worked rather hard to free us from.
~~~~~~~~~~~~~~~~~~~~~~~~~~~~~~~~~~~~~~~~~~~
The Ginning of Cotton
There was one particular method of ginning cotton by hand that I desperately wished to explore. But--- I needed some raw un-ginned Cotton. And Time interceded again, and played a factor.
It wasn't until I took some time and carded the cotton bolls that were gifted to me, by a fiber friend on Facebook---Amy Matilda---that I finally found my truer passion for Cotton.


During a couple of my visits to the doctor's office, I sat in the waiting room and hand picked the seeds from the compacted bolls of Cotton. Compacted due to storage, packaging and shipping. I carefully pulled the willowy fiber from around the seeds. Tedious? OMG, YES! But, also what a wonderful way to learn about the fiber, and how it grows around the seed.


The funny Waiting-Room story here? There was a woman who had been sitting with her husband; I had seen them arrive, and take their seats. After about half an hour or so, she came over to sit beside me and ask what I was doing. She commented that it looked like I was crocheting something, but couldn't tell what it was--- NOT!
Seriously. There is no way in Heaven or on Earth that what I was sitting there doing looked ANYthing even remotely like Crochet. Bless her heart, but--- NOT! (~: Nonetheless, she was quite fascinated, and thanked me ever so much for talking to her about raw Cotton, and the subsequent preparations for hand spinning.
 Thankfully, I found other ways of which the World gins Cotton by hand! Well--- there ARE tools involved. And there are a several examples online, showing people ginning Cotton with Pasta Makers. And, I would just love to own one of these Asian Hand Crank Cotton Gins.
BUT! Prior to finding a Japanese source online [and Many Thanks to Susan Byrd, for finding and sharing it with me], I discovered an Indian method that--- once I found my own version of the required implements of production--- it has become my method of choice. It is decidedly less tedious [though Production Spinners may argue that point], and it works beautifully. And, since I work rather small scale, it is perfect for me.
I will have a separate tutorial on this shortly; and will link it back here once I have it posted. So--- keep an eye out for the following blog Header [UPDATE: Blog post is up and running and linked!] : Ginning Cotton by Hand. Until that time, there are a few videos that I included in my Resources at the bottom of this post. Enjoy!


~~~~~~~~~~~~~~~~~~~~~~~~~~~~~~~~~~~~~~~~~~~
The Bowing of Cotton
 In the absence of Hand Carders? I mean, you do know that not all cultures, in history, use(d) them. Right? (~;
As I discovered the Asian and Indian and Mesoamerican methods of Ginning Cotton, I also became more familiar with the concept of Bowing Cotton. I first learned of this practice though, via the delightful Spin Flax and Cotton DVD, by Norman Kennedy. It being somewhat of a Southern, Cajun thing. But, trying to find more about Cotton Bowing, outside of Mr. Kennedy's DVD, proved to be a challenge. I found a rare few archaic images via online search results, but not a whole lot more.
Until--- [after receiving said help regarding a Asian Point Spindle (but, more on that later.)] I determined to translate my searches into Japanese. y-y-Yes! The Japanese still practice Cotton Bowing. And, it wasn't until I keyed "Hand Bowing Cotton" [it took me a few phrases to find the best result] into Google Translate, and then Copy/Pasted the Japanese characters: 手お辞儀綿 into YouTube, that I started to find what I was looking for:
Bamboo Watayumi-Watauchi videos
 While it is known more as a Winnowing Bow, this is what I had been hoping to to find. You are more than welcome to scroll through, and find some of the images and videos I've collected over the last couple of years, in my Fiber Preparation board on Pinterest. Though I am including a Resource List at the end of this post, some of the images are drawings of ancient practices, and many are what is still being used throughout the world today.
I wanted to find what I could, because I was determined to create my own bow. But, since I have somewhat of a restricted access to the materials I would prefer [Living on SSDisability, I live on a very limited income, and I no longer drive], I figured the only way I was going to make this work, was to find the right tree branch, and create a bow similar to Mr. Kennedy's example.

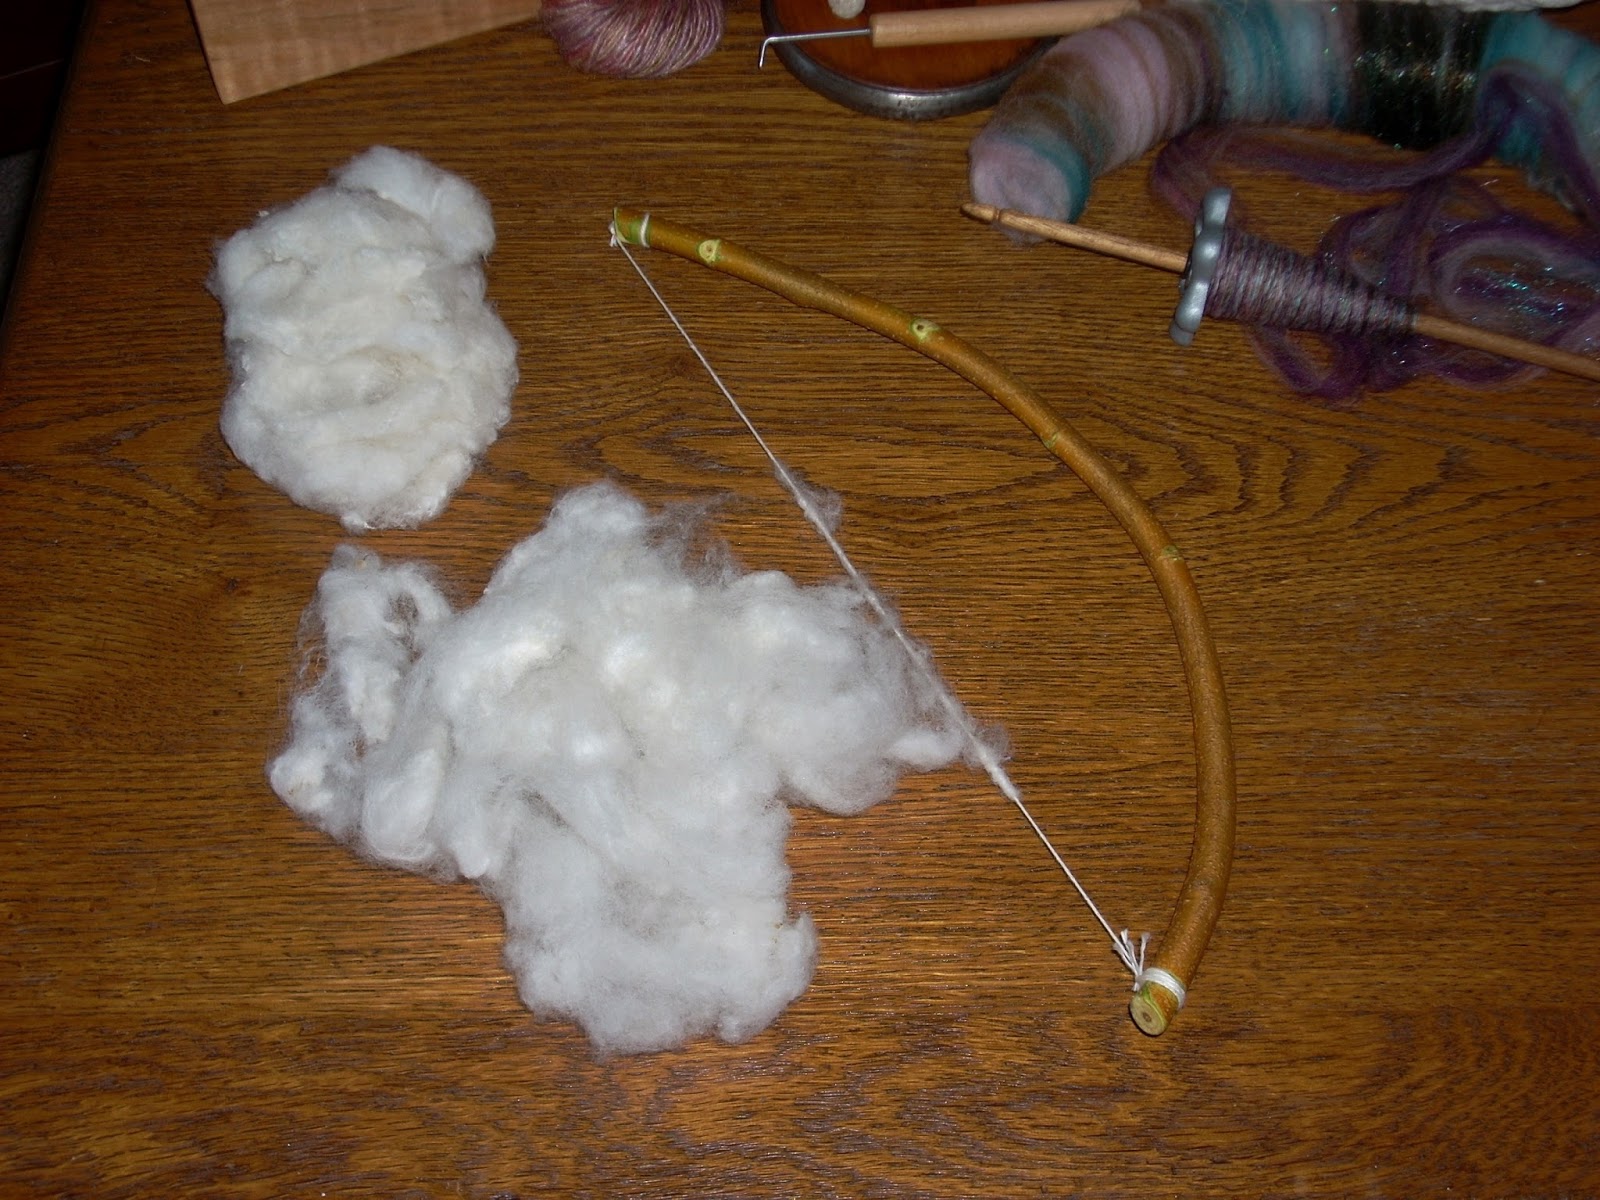
And so--- my search continued for a better branch; for a second try. During this past Fall, as I was trimming back my spent Sunflowers, I also trimmed back a young tree growing close to my patio. This branch is much lighter in weight, and has considerably more spring. This bow works! Though, being in such a rush for success, I still need to tidy up this branch, and restring it.


Plus, check out this Kathleen Klumpp vimeo video, at around 6:40 in, for Picking Seeds by Hand, and Beating Cotton, and much more.
~~~~~~~~~~~~~~~~~~~~~~~~~~~~~~~~~~~~~~~~~~~
The Carding of Cotton
 Recently, aside from carding up that last bit of Brown Roving that I mentioned earlier, I had yet to sit and card up a proper puni. And, I needed a few, as I had two particular spindles upon which I seriously desired to practice. A carved Jade Bead spindle that I made [back in October], and My Prototype of the Asian Point Spindle of which I fell completely in LOVE.
So, I pulled out my box of hand picked [Waiting Room] Cotton, loaded up my excellent-bargain Straucht Hand Carders [that I found on ebay a couple years back; for only $50], and carded my beautiful cotton fibers. It was time to spin.


~~~~~~~~~~~~~~~~~~~~~~~~~~~~~~~~~~~~~~~~~~~
The Spinning of Cotton
Now. As for Spinning it--- ? There is one thing that stands out most in my experience. It is that singular moment when you pull on that Puni, and work your first true Long Draw draft. It is when you give in and trust it's going to do exactly what you've seen other Spinners do--- time after time after--- It's that bridge between the Courage you mustered up, and the exhilaration of--- It DOES work! (~:
That all said--- it can still all boil down to what tool works best for each Spinner.
~~~~~~~~~~~~~~~~~~~~~~~~~~~~~~~~~~~~~~~~~~~
Constructing the Asian Point Spindle
I would love to own a Japanese Spinning Wheel. But--- sitting on the floor, is not in my doing these days. And, I've simply no funds for purchasing one. Here are two wonderful examples of Cotton Spinning Wheels Then and Now.


 But--- it is THIS little spindle--- I do not remember how long ago it was that I first saw a photo online labeled simply: Asian Point Spindle. Though I believe it could be admitted to in years; with an S. However it was, I was Smitten! It then took me seemingly forever to determine how I could possibly make one for myself; to not only bring my version of this little gem to fruition; but--- how I would indeed even accomplish the task.
Back in September of last year, I eventually determined two things. First--- how NOT to make one [due solely to my lack of proper tools]; and Second--- how I MIGHT make one. The absolute smartest thing I could have decided though, was to create a Prototype first, in order to figure out the proper construction.
It truly is this spindle that renewed my interest, and had me falling in love with the prospect of spinning Cotton; all over again. I had such an overwhelming sense of it being the epitome of Simplicity. And, with the help of *Susan Byrd [Song of Praise for Shifu, Shifu Sanka], I learned the proper name for this charming little spindle is Danushu-Charuka.
* Susan Byrd has been such a lovely and gracious mentor to those of us
 |
| Danushu-Charuka |
 |
| My Prototype |

So, In order to bring my idea to fruition, I needed to make it work from items I already had available; either in the studio or around the house. I had no budget [in my very limited income] for ordering the proper Bamboo--even if I found it online--or for the Wind Chimes for that matter! And, since I no longer drive, making trips to the local Home or Handyman stores for the other more proper woods and/or tools, was out.
SO--- I continued to ponder on my creative options.
Think. Think. Think.
The first alternative idea that initially came to mind was to craft one in: Clay. I have an idea for a Circle Weaving Loom that I've been wanting to do in clay, so this idea truly is not that far of a stretch. I can see it my head; and while it has a foreboding sense of it being too fragile, I still want to work on the design. I waited until mid-year [when I'm out from under the Winter Heating Bills], when I could squeeze the purchase of a pound of Air Dry Clay into my (for all intents and purposes) non-existent budget. [I just shopped for cheaper Coffee. (Heavy sigh)] This is exactly what I intend to work on later this year. But, prior to rolling and cutting any shapes, I really do need to be sure of the best overall construction.
I've also been wanting to share this project for some time; but--- health or household duties or any number of other studio-related creativity simply took precedence; at any given time. But--- if you Liked my HeartSong Studio Community page, some time in the past, you may have seen a few of the images I shared back in September.
NOTE: For an even better understanding of the following images,
I copy/pasted the Japanese text found at this blog, into Google Translate.

Working on this prototype clearly made it so much easier to see how I will need to cut and mold one in Clay. And, yes! I had some perfectly round Toilet Paper Rolls that I thought might be just right for this particular endeavor. And, because of my work with these paper rolls, I have another idea that I may well craft out before I ever get to the clay model. (~:
While the Japanese version of the bamboo rolling stick is bent, I had absolutely no way of creating that kind of bend. All I had that I figured would even remotely work were some unfinished 5/16 weaving slats, which I glued together; one on top of the other.


The Japanese version shows a strip of rubber adhered to the bottom side. And the only thing I could think to use was a bit of Kitchen Shelf Liner. So, I pulled out my quilting Rotary Cutter, measured accordingly, and glued.


For the sake of the long-term duration of this spindle, even though it is basically temporary, I decided to reinforce the cardboard holes with metal grommets.


As for the Point Spindle itself, I am using 8" metal 2.5mm [if I'm remembering correctly]
Double Pointed Needles [or DPNs]. I used tiny O-Rings to secure the beads in place; on either side. And, no. You don't really need that many beads on the non-cop side of the Spindle Shaft, or probably even ones that large. That's just me, adding my own bit of flare.

And, the only thing I could find flat and narrow enough to use as bar that holds the base of the spindle in place, was an old ruler. If I don't find anything else to use--something a little more plain--I will likely paint the ruler. We shall see. (~:


While one version shows the bar going through both the front and back of the base, this version did not. Meaning--- I did not create a cut on the back side; but--- I believe I will experiment with that further, to see if it truly makes a difference.


To remove the Spindle Shaft, I simply remove the O-Rings and Blue Beads. I'm keeping a few spindles prepped and ready, just like Indian spinners do with their Book Charkhas. But--- that may well be wishful thinking on my part. (~:

As I indicated earlier, anyone else may chose to use only one decorative bead. I liked the idea of--lightweight though they are--adding a bit more of a counter weight. And, the whole idea anyway, is to find the proper fit of Spindle and Bead.


~~~~~~~~~~~~~~~~~~~~~~~~~~~~~~~~~~~~~~~~~~~
Now, as for how it spins? The premise of this little gem is that the Bamboo Stick rubs directly across the Steel Pin [in this case a DPN], or the Spindle Shaft; rolling the Point Spindle. I took 3-4 rolls before I felt there was enough twist to continue drafting.
The Japanese sit of the floor and hold the bar in place utilizing either their ankle, foot, or knee.
 |
| Yachiyo Report |
 |
| Truewave Blog |
There is no way that I can sit on the floor these days. So, I knew straight away the only way I was going to be able to make this work, was to create a table top version. And I had the perfect Spare Part.
This little clamp is from the base of an old Clamp on Swing Arm Table Lamp. And, while I do have a newer version waiting patiently on my Amazon Wish List, this one will do nicely for now.

Another advantage to this little spindle? Think Right-Handedness vs. Left-Handedness.
While I set up as things are shown in the Japanese images and sites, I am NOT very good drafting solely with my left hand. I have similar advantage with my Little Meggie Kick Spindle, in that--- I can turn it and spin in either direction depending on what and/or how I am spinning.
The good thing here is that I am now able to turn my Prototype to face the opposite direction, and be able to roll the spindle shaft with the stick in my left hand. Leaving my right hand free to draft.


As I indicated somewhere above, it wasn't a perfect spin by any means. But, all plied up this little sampling is quite an achievement for me. And, I feel Blessed for having had the experience.

~~~~~~~~~~~~~~~~~~~~~~~~~~~~~~~~~~~~~~~~~~~
Creating a Bead Spindle

While I do own a beautiful Antique Spinning Wheel, which spins BEAUTIFULLY I might add, I tend to gravitate to Spindles. Bead Spindles are basically the simplest form of spinning, and are generally utilized to spin fibers with a shorter staple; like Cotton. And they have been around since--at very least--the Stone Age. They are also one of the easiest spindles to make. And this little spindle is just a Joy to Spin. And this is the spindle upon which I had that "singular moment" where I bridged my Courage to do what I knew I could do.
Again, you are more than welcome to visit me on Pinterest, and scroll through my Spinning Board, for any number of examples of Bead whorls.
 You need speed for the spinning of Cotton. And this little Jade Bead Spindle has all the speed I could possibly require. I spent several days with a basic hand bead reamer, enlarging the industry standard hole in this large hand carved Jade Bead. DAYS. I admit to wanting to pull out my Black & Decker power drill and get the job done--- ju-u-ust a tad faster. But. I did not want to risk any damage I could have caused. So--- I very slowly reamed away. My utilizing rubber O-Rings just helps to add a more finished look. I had a set of 5 2.25mm 8" Bamboo DPNs that I could afford to sacrifice one for the cause--- So, VOILA!


 Once this little spindle was finished I kept thinking about a similarly carved Jet Bead. Many years ago, I did some beadwork and set up to sell. Though packed away, I had this chocker style necklace still on hand. I mulled over the idea of cutting it down to repurpose. That said, I truly hated the idea of tearing down a perfectly good necklace. THAT said, setting up a vending booth was just NOT in those same Cards. And it wasn't doing ANYone any good packed away. So--- I pulled out necklace--- and my trusty Wire Cutters, and---- Snip!
This round of reaming is taking a good deal longer, as Jet is considerably softer. So, I'm working very slow to prevent any more chipping [minute though it be] than I've already caused. Though I can hide it easily enough with my trusty O-Rings. All this aside, I know it will make for a pretty spindle when I'm done.


~~~~~~~~~~~~~~~~~~~~~~~~~~~~~~~~~~~~~~~~~~~
The Growing of Cotton
 While growing Cotton is not totally unheard of in Ohio, our history simply developed differently from what are known as the traditional Cotton growing states. All that said, growing Cotton in SW Ohio, even on a very small scale, can be a Challenge. I was determined to give it a try though. But, aside from my desire to experience growing it for spinning, there was a memory of an old article, from some old craft-related magazine, regarding Crafters growing Cotton in Containers. It echoed in my mind, until I brought it to the fore; eventually making it happen.
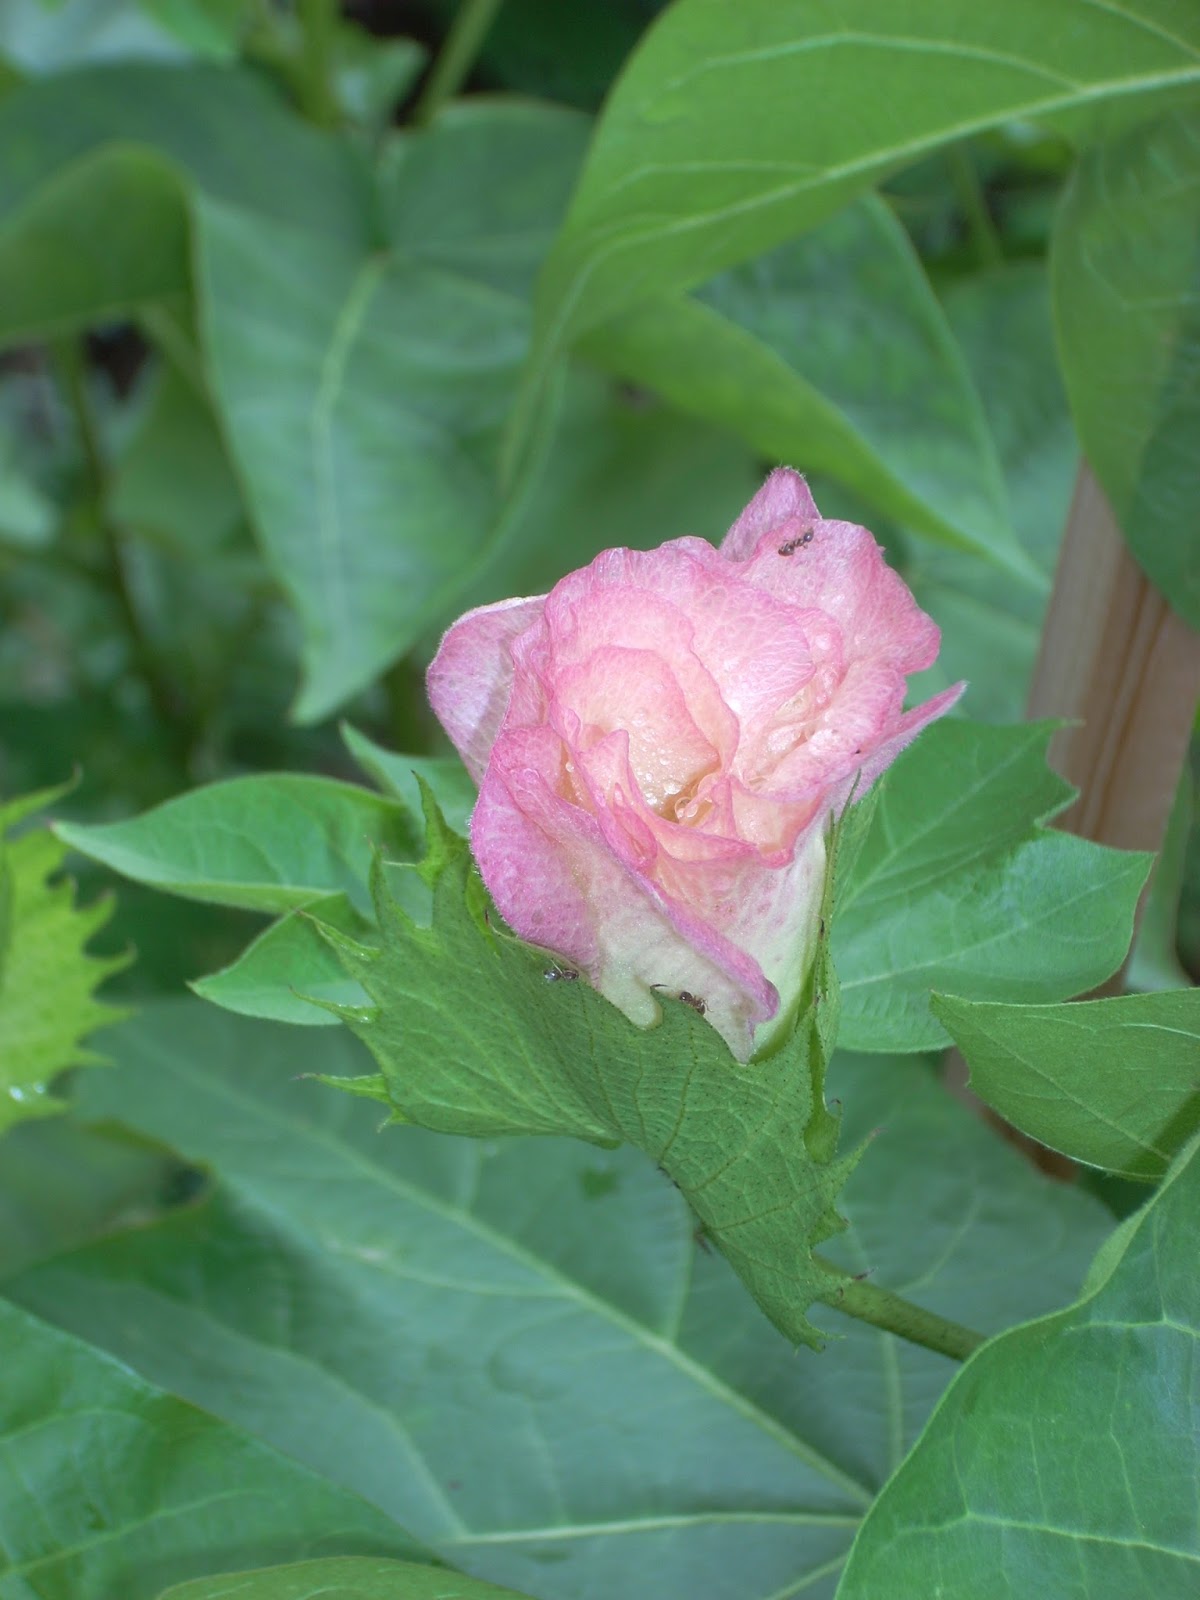 I look forward to a successful growing season one day. I say that, because three Summers back, I sowed a commercially packaged seed in my humble little garden space. Unfortunately, I started it too late, and was not able to see it through to a harvest. The brown shells, or casings [not sure of the proper term] had formed, and I stood looking up one afternoon, about mid-Autumn, asking, 'Just a few days more? Can you not give me just a little more time?' But, it was not meant to be. The seasonal temps were dropping. Almost. The Summer warmth was gone. Not enough time. And, Jack Frost was beginning to nip at the morning air. Cotton requires a much longer growing season, and I simply got too late of a start.
What I am thankful for, is having had the opportunity to have planted it at all. I had no idea how pretty the plant itself is. The flowers are just lovely. And, what fun as I puttered around my garden, to watch the blossoms turn color throughout the day.
If you'd like to try your own hand at growing Cotton, here is Joan Ruane's page for growing requirements.

~~~~~~~~~~~~~~~~~~~~~~~~~~~~~~~~~~~~~~~~~~~
In Closing?
As I contemplated my parting thoughts, there came an echoing. And I am reminded of the closing of a well-read poem. Timely words written--- 100 years past.
Somewhere ages and ages hence:
Two roads diverged in a wood, and I,I took the one less traveled by,
And that has made all the difference.
~Robert Frost, The Road Not Taken, 1916
This has been my journey into the World of Cotton. It may not seem the most traditional of routes. (~: But then, I don't always take the most expected of turns. And thought it is still just a Beginning--- it had been made ever easier and doable, via the wonders and acquaintances of the World Wide Web.
That said?
May those who ventured this far, be somehow Inspired by what they found here. And along the way--- May they log in and chart new courses all their own. Blessings~
~~~~~~~~~~~~~~~~~~~~~~~~~~~~~~~~~~~~~~~~~~~That said?
May those who ventured this far, be somehow Inspired by what they found here. And along the way--- May they log in and chart new courses all their own. Blessings~
Video Resources
Ginning Cotton with Pasta Maker
Ginning Cotton
Ginning Cotton
From Ginning to Spinning
The experience of Cotton to Yarn
Ginning and Cotton Bowing
Using a Hand Made Yarn Spinning Machine
Cotton Preparation Ginning and Bowing/Beating
The Phou Tai process of Cotton
Ancient Cotton Spinning, in Zapote, Manabí
Spinning Cotton in Ecuador
Spinning Cotton in Manabí Province, coastal Ecuador
Seems tedious, but LOOK at the length of those fibers
Top Whorl Spinning by Abby Franquemont
Spinning Cotton from the Seed
Master Spinner Joan Ruane
Joan Ruane Spinning on Indian Book Charkha Parts One and Two
Spinning with a Takli
Growing Cotton Plants
~~~~~~~~~~~~~~~~~~~~~~~~~~~~~~~~~~~~~~~~~~~
Online Resources
Online Resources
Joan Ruane's website Cotton Spinning with Joan Ruane
Fearless Cotton Spinning -- article by Jill Holbrook Cotton Clouds' Talk
Danushu-Charuka--PDF in Japanese
Asian Point Spindle--Danushu-Charuka Japanese Search Result
Japan cotton Kamogawa Kazuwata plantation--Fiber and Tools Japanese Storesite
Fiber Preparation and Hand Spinning Japanese Workshop
Truewave Blog showing use of Danushu-Charuka Japanese Weaving Workshop
Truewave Blog post showing the process of preparing Cotton Japanese Spinning Workshop
Cotton Beating--Yahoo Japanese Search Result 綿打ち [わたうち]
A History of Japanese Textiles -- Spinning Hemp and Cotton
Retail Site -- Japanese Spinning Wheel Inagaki Kiryou
Retail Site -- Another Japanese Spinning Wheel Inagaki Kiryou
Hand Spinning in Ponduru, Srikakulam District, with Andhra Pradesh
A History of Muslin Fabric--Our Story of Dhaka Muslin I Love to Spin Cotton is a group of people [on Facebook] who love to spin, knit, weave, dye, make tools, and grow cotton. It is dedicated to helping beginners. Long-time Cotton Spinners, Weavers, Growers, etc., are ready to jump in and share their experiences.

~~~~~~~~~~~~~~~~~~~~~~~~~~~~~~~~~~~~~~~~~~~
Please consider

__________________________________________
What's Next?
As stated above, my Ginning Cotton by Hand post is pending/forthcoming. It will be a much quicker post. Again, we're talking simplicity.


And, since March is National Crochet Month, I will be working very hard, straight away, to get my How To blog post up; by the end of the Month.

Until then,
__________________________________________Leave any questions you may have in the Comments.
Or Facebook Friends can Private Message me.
Follow me to my Facebook Community/Studio Page @ HeartSong Studio
Bye for now, and Blessings~
And Happy Weaving!
