Showing posts with label Arlene Thayer. Show all posts

Monday, February 22, 2016

Weaving Upon Circular and Round Looms


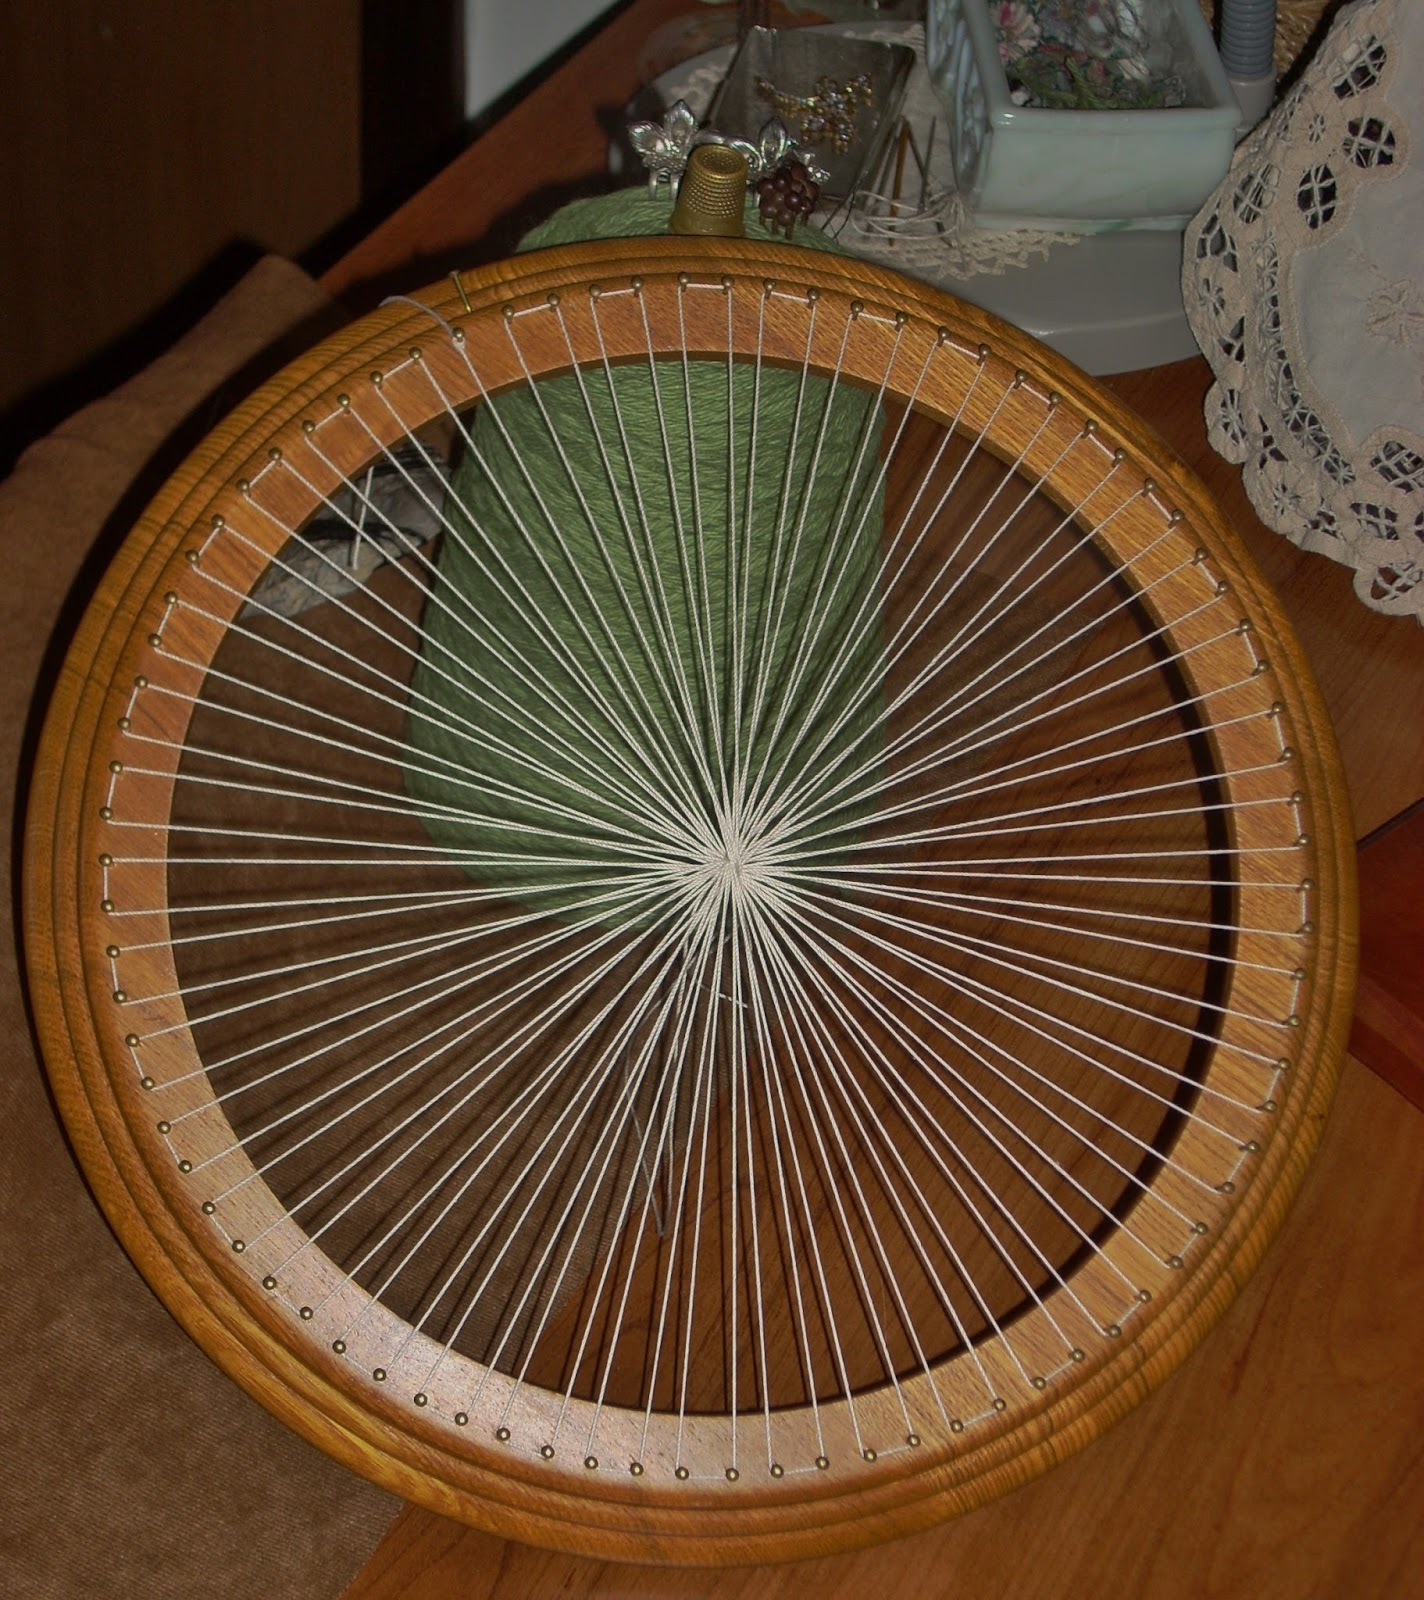
Those of you familiar with this blog know that my Journey into Circle Weaving started on a Provo Knifty Knitter Loom.  A good 2 years ago, I purchased a 12" round wooden picture frame. Quite some time later, when I was able to squeeze it into my budget, I picked up a small box of brass finishing nails. This past Autumn--- while it took me a few weeks to accomplish, I hammered in a good many of those little nails, to craft myself a finer gauge Circle Weaving Loom.

While I have a little bit of hand spinning I wish to finish up first, this is likely the next loom upon which I will weave.  There's a Four Seasons theme that's been mulling in my brain. And, I've got a new idea for some bead work on this project, with which I am dying to play.

Suzy Brown's Old Drum Carder Gear
While weaving in the round, circle weaving, or circular weaving [however you wish to define it] is [as I stated a few years back in Leading the Way] nothing new [though many of us can say Suzy Brown (WoolWench Handspun Yarn), breathed new life to into the craft]---some of the looms upon which we can needle weave, definitely are. 

Weavers Young and Old, New and Seasoned, are finding many ways to enjoy this more specialized weaving passion, whether by Metal Craft Rings; CDs; Pizza Box Lids; Hula Hoops;  Wilton Cake Rounds; Embroidery Hoops; Wire Wreath Frames; Bicycle Wheels and Other Parts; or pretty much anything round.

The focus of this post, is to share and link you to the many commercial and/or independently designed looms that are available to us these days. While a few looms listed below are more specialized [for the weaving of tams/berets] others simply reflect charm, artistic flare and/or a simple preference of design. Enjoy!
~~~~~~~~~~~~~~~~~~~~~~~~~~~~~~~~~~~~~~~~~~~~~~~~~
Circle Loom, by Rodier Creations


Circular Loom, by Majacraft
 
 
Métier à tisser circulaire [Circular Loom, this is a French site], by LE GEANT DES BEAUX-ARTS 


Métier à tisser circulaire [Circular Loom, this is a French site], by le petit Maunel


Círculo Telar [Circle Weaving Loom, this is a Spanish site], by Hilokune - Estudio Logaro


Tissage Circulaire [Circular Weaving, this is a French site], by Atelier des Bruyeres


Circular Weaving Loom, by Seven Yaks


Circular Loom in Wood, by Gluckskafer and Natural Mom Gear

 
Circle Weaving Looms, by Twill Textile Designs


Grimm's Circular Weaving Frame, by Bella Luna Toys


KK Replacement Looms, by CinDWood Crafts

http://www.cindwoodlooms.com/product/large-round-afghan-loom/
 
Knitting Looms, by Cottage Looms


Kumihimo Disc, by Katerina Collection


Large Circular Weaving Frame, by The Wooden Wagon


Round Knitting Looms, by Boye, Provo, Knifty Knitter, Knit Quick, Martha Stewart, etc.

 
Round Looms [South Africa], by Vaalcraft
 
 
Round Knitting Looms, by The Loom Room
 

Round Weaving Looms, by The Unusual Pear


Weave-a-Round, by Wild Hare Fiber Studio


Weaving Loom, by Quirky Bits-n-Pieces


Wee Looms, by Janda Multimedia

 
Métier à tisser de roué [Wheel Loom, this is a French site], by Felaine
 
Special Note: I could not find a merchandising page or link,
and have a query in regarding any potential purchasing info for this loom.

 
Wooden Loom, by Anastasia Bagena Arxontaki [this is a Greek page], and GAwoodenloom 
 
~~~~~~~~~~~~~~~~~~~~~~~~~~~~~~~~~~~~~~~~~~~~~~~~~
SPECIAL NOTE: If you are an Independent Craftsperson, a designer of a new loom for Circle Weaving--- someone whose work I have yet to see, you are invited to provide a link to your product in the Comments.
~~~~~~~~~~~~~~~~~~~~~~~~~~~~~~~~~~~~~~~~~~~~~~~~~
Book-related Circle Weaving Resources
 
Weaving Off-Loom [Chapters 5 & 6], by Dona Z. Meilach (Author), Lee Erlin Snow (Author)
 
http://www.amazon.com/Weaving-off-Loom-Dona-Z-Meilach/dp/0809289229/ref=sr_1_1?s=books&ie=UTF8&qid=1456155850&sr=1-1&keywords=off+loom+weaving


The Technique of Teneriffe Lace by Alexandra Stillwell (PDF Download)
 

Teneriffe Lace : designs and instructions Cornell University Library (Books Online)


~~~~~~~~~~~~~~~~~~~~~~~~~~~~~~~~~~~~~~~~~~~~~~~~~
Online Resources
 
HeartSong Studio Tutorials and Projects for weaving on Knitting Looms by Laura Abbott [BlogTalkRadio]
Majacraft Resources Check the links for Tutorials for free Downloads, and Videos for helpful Warping and Weaving information by Suzy Brown.
~~~~~~~~~~~~~~~~~~~~~~~~~~~~~~~~~~~~~

And, as always, you are more than welcome to join the well-over 1800 members of the Facebook Circle Weaving Group.  You will find a multitude of styles, experience, how-to's, and inspiration.  This group resulted from the very popular, and flagship course of the, FiberyGoodness Spinning Courses, and was launched by Suzy Brown [WoolWench Handspun Yarn]Andrew Poad [Majacraft], and Arlene Thayer [Spin Artiste].
Plus, you are more than welcome to visit me on Pinterest and see the many different styles and examples of Circular Weaving; from all around the world.
~~~~~~~~~~~~~~~~~~~~~~~~~~~~~~~~~~~~~~~~~~~~~~~~~
 http://heartsongstudio2.blogspot.com/2016/02/services-rendered-wish-list.html
__________________________________________
What's Next?

I'm drafting out a All-in-One HeartSong Studio Resource List. And, I am working on completing a few posts that have been sitting way too long in the Draft Folder. Until then,
__________________________________________
Leave any questions you may have in the Comments.
Or Facebook Friends can Private Message me.

Follow me to my Facebook Community/Studio Page @ HeartSong Studio
Bye for now, and Blessings~
And Happy Weaving!


Monday, June 29, 2015

A Little of This-N-That and FIBERYGOODNESS!

Just a quick blog post today, to share a little bit of This--- a-a-and, a bit of little That.
 
First off I really want to say Thank you, again, to Everyone who visits my studio blog here. Thank You for all your Pins to Pinterest, and to those who took the time to recommend my blog to Google.
 
If you have found any of my posts helpful, take one extra moment to click G+ to Recommend this on Google, so that others can more easily find their way here as well. And, if you haven't already done so, you are more than welcome to add HeartSong Studio to your Google+ circles and/or make sure you Join This Site for update notifications.
 
Next? I'm working to make this space as user- and social media-friendly as possible, and have been working on the contents of the Side Bar. If you scroll through, anyone new here might find the most Popular Posts -- of the Last 30 Days, helpful.  
 
A few months ago, I added Fiber Favorites [my favorite artisan and fiber artist shops (have more to add, so---  I do not consider this list complete; just yet.)]My Blog List, and just recently--- the new global Visitor feature. I love seeing who all stops by from around the world.
 
New [as of today], is the Follow Me to Pinterest widget.  I've numerous boards on subjects such as Weaving, Circular Weaving, Spinning, Fiber Preparation, Knitting, Crochet, Rug Making, Darning, Homesteading, Gardening, Food Stuffs, etc. The Artisan and Craft-related boards are filled not only with examples of the end results-- I've worked hard to build libraries to include techniques, tools, tutorials, and videos. I hope you will join me there.  
Over this past weekend I created the Spool Knitting board.  This one will come in handy for an upcoming post I'm currently working on. It's a follow up to, or sister post, if you will, to the Vintage Bobbin Knitting Spool, updated back in June. ----[NOTE: I will be making corrections to this post soon. This is a Textile Mill Spool, and for some unknown reason, I had "Bobbin" stuck in my brain matter the whole time I drafted out this post. So--- Corrections Pending.]  
Though I am not on there with any degree of regularly, you can find me on Twitter as well.  I always include a Tweet when I post a new update. So, stop by for a Follow.
 
https://www.facebook.com/HeartSongStudio2014/photos_stream
Click to go to HeartSong Studio Facebook Community Page
But most important--- If you have not already done so [I've Welcomed so many new Likes to my Community Page this year], join me over on my studio page on Facebook, where I post most often.  I share Status Updates, and photos of WIPs, etc., long before I get a particular project written up and shared here. And, you can find out ju-u-ust a little bit more about my Fossil Weaving over there.  I also just introduced a new feature recently, HeartSong Studio Tips.

http://www.threeravens.net/events/tour-de-fleece-2015-team-nevermore/Today's status update included a Declaration of Intent!

While I am currently in Sewing Mode [what with mending and up-cycling desperately needing my attention], I'm spending this week getting ready to participate in this year's Tour de Fleece

I am rider No. 42, on Team Nevermore Forevermore! And, while I am by no means a production spinner, I have a few ideas I want to work on, and will be posting my efforts on Facebook throughout the tour---beginning July 4th, and running until July 26th.

SPECIAL NOTE: Cheering from the sidelines is encouraged.  And, would be most welcomed. (~:
____________________________________________
Now, for the really FUN News!
 
It's FIBERYGOODNESS TIME---- Again.

Yesterday Suzy Brown [of WoolWench Handspun Yarns] teased us [Journey to the Golden Fleece members] with the following graphic.  We knew not exactly what it is; but, there were likely a few felines what were about to keel over from kill-worthy curiosity!

Natalie Redding [Namaste Farms] joined the last round; presenting what I understand to have been remarkable live video Hand Dyeing classes.  Her sessions filled up quickly, as Natalie has that kind of reputation. She is VERY GOOD at what she does!

Then, this morning came the official New FiberyGoodness Course announcement, of Suzy Brown's and Arlene Thayer's [Spin Artiste]: Sketch Spin Scribe.  It is described as "a seven part creative journey for fiber artists."  This is about Yarn Design.

One sweet little phenomenon that came out of the previous rounds of Journey to the Golden Fleece, was Circle Weaving. This course offers a beautiful crafted opportunity to become a Fiber Archivist, and create and bind your own Heirloom Book. [I knew it was going to be something I couldn't afford, but would likely really want! (~: ]

And as before, there will be modules and a fair amount of time to complete each yarn. There will be step by step instructions, and as always--- a wealth of support.

SO!!!! If you've any interest, whatsoever, in learning more about the artistic side of Hand Spinning and Yarn Design, NOW IS THE TIME TO ENROLL!

For now---- Everyone is welcome to join the Journey to the Golden Fleece's 
FIBERY GOODNESS Facebook group.  It's still a Public Group, filled with Fiberholics from around the world. Just stop by and say, "Hello!"

SPECIAL NOTE: Today is would be a very good day to join the group; as there is a "Hunt" afoot.  One that could financially--- be very beneficial!

OH, and--- There's a FibeyGoodness Tour de Fleece group this year.  I'm spinning for them as well!  I've got my goals set. Now, I just need to gear up.
__________________________________________
What's Next?

I was in Re-Org Mode for most of last week.  I needed to clear off my Sewing Tables so that I could refocus some time for sewing.  What's sitting on my Type Setter's desk at the moment, pretty much all has to do with what I'm working on; weaving-wise. I've got two warpings that I need to set up and photograph for upcoming blog posts.

Plus, I need to finish up Part One of my Spring Weaving; still on my small, and custom-painted [by Suzy Brown] Majacraft Loom.
And, what on Earth could that vinyl tubing have to do with anything Weaving? Well--- You are NOT going to FIND OUT today! (~:

There is also a little diversion that I'm looking forward to sharing with everyone.  I'm waiting for something very special to show up in my mailbox. It's coming from Florida.  Once it arrives, I can finish setting up the photos I need to show a special Hand Ginning technique.

Until then---
__________________________________________
Leave any questions you may have in the Comments.
Or Facebook Friends can Private Message me.

Follow me to my Facebook Community Page @ HeartSong Studio
Bye for now, and Blessings~
And Happy Weaving!

http://fiberygoodness.com/

Thursday, February 26, 2015

Be My Valentine -- In the Round


Be My Valentine
A Weaving in the Round
_________________________________
*If a picture is all you need, click on the image above for a Slide Show
 
SPECIAL NOTE: For a larger view of individual photos:
Right Click on a photo and chose either
Open link in new tab --or-- Open link in new window
 
This is going to be more of a quick Pictorial Overview, than a tutorial, of the quick little Circular Weaving I did to celebrate Valentine's Day. Unfortunately, I did not get a photo of every individual step, because I simply gave no thought to uploading the process here.  I was sharing photos as I went along, on Facebook; but--- there is a nice little feature to this piece that any given weaver might find helpful and/or useful in their own circular endeavors.  So, here we are.  I hope it sparks your imagination. 
 
For all intents and purposes, I hadn't even planned to do this piece.  My work table wasn't even set up for weaving in the round.  But, it was a FiberyGoodness Circle Weaving post on Facebook, by Arlene Thayer [Spin Artiste], that sparked my imagination. It also just happened to be on the same morning I was scrolling through a Pinterest board I had created for a FiberyGoodness blog post on the topic of: Love

The day was February 13th. I knew I couldn't finish this kind of project in a day; or even two. But--- the die was cast. And, I couldn't shake the burst of Creativity she had inspired.

This right here, being what all the Inspiration was about!
Fiber Artistry by Arlene Thayer ~of Spin Artiste

The one advantage I had going for this spur-of-the-moment project was the fact that this particular loom [the Green 9" Round Hat Knitting Loom (36 pegs)] was long ago warped, with the center already woven in place.  

Unfortunately, what I do not have is the best photo of the initial outline of the heart. And, as much of what I do dictates, I needed to work with what I already had on hand. The only bold red available was a skein of Lion Brand Homespun Yarn: Candy Apple Red. It was perfect, since it also added a fair amount of texture. I simply roughed out the primary shape, and then filled it in; weaving inward from the outer edge.

I would very much like, one day, for a project to be created entirely of my own handspun yarns.  But, I am not a production spinner.  Health issues tend to keep things on rather a small scale.  That said, this project gave me the opportunity to include a recently spun yarn [from a beautiful Norwegian Top], and my first-time use of a Top Whorl Spindle; both from Tina's Angoras

An absolute must, color-wise, was to include a yarn I had spun quite some time back, using a beautifully hand dyed and hand pulled roving from Larkspur Funny Farm and Fiber Arts Studio

This yarn resulted from my first-time-ever using a Russian Support Spindle. I love this spindle! And, while that skein is rather large [average and normal for so many others spinners], that single ounce of fiber took a few months for me to spin into a Lace Weight single.  The eventual plying, was a whole other nine yards. (~:


And, as I am want to do, I embellished this project with a little bit of wire and bead work.  Actually, before I even started to weave, I pulled out a the silver-plate wire, along with my wire jig, and fashioned a treble clef. And, yes. You got it! (~: I needed this piece to be representative of HeartSong Studio.

I also meant for there to be a heart-shaped bead inside the body of the musical symbol; but--- I got all caught up in making sure I had the proper shape, and the wire strands over and under itself in the right places, that--- I forgot to slide on a bead. I simply did not want to undo or bend anything already secure, so--- That just means I'll be making another one of these stylized clefs in the near future.
 
I should say that what I did give thought to, prior to weaving, is spinning a yarn specifically designed for this project.  That's actually how the strand of carved Mother-of-Pearl Hearts and Czech Fire-Polished Glass beads came about---- think pre-strung plying.  I soon scraped that idea, though. Had I committed to the hand spinning, I would NOT have finished when I did. Which, thankfully, was just before the end of February.


I thought this would be a good project to play around with--for a little added interest--the Clasped Weft Weaving Technique. Something of which I became familiar with in Saori Weaving, and intend to do a good deal more of in the near future. I believe this technique lends itself well to weaving in the round.  

After I added in a textured round of an Eyelash Yarn I had on hand, I finished off with another Lion Brand Homespun Yarn: Pearls.
 
 
As I indicated earlier, about not giving prior thought to this post, I do not have a photo, of any kind--fair or bad, of one important step. The Encased Wire. Including the wire in your finished edging helps a wall hanging to retain its shape.  There will be no drooping or odd curling from prolonged hanging.

Prior to crocheting the first round of Single Crochet [See On Loom Edging, from the Finishing Touches post.], I did two things:

First, I measured out and cut a strand of the same cotton warp thread, tying on and off using the bottom-most pegs; on either side--at the point of the heart. [See Off Loom Edging--Prepping an Edging Threadfrom the Finishing Touches post.]

And Second, I measured and cut a single piece of medium gauge floral wire, and then wrapped it around the outer edge of the loom, similar to Prepping an Edging Thread.

SPECIAL NOTE: If anyone has questions regarding this step,
a Comment to this post, and I'll  be happy to answer them. 

Below is the best zoom I could upload here, that shows just the littlest bit of wire peaking through where I temporarily attached it to the bottom-most pegs; at the point of the heart. 

Once I removed the weaving from the loom, I closed the ends with one twist of the wire; folding the ends back onto themselves, and then buried the ends inside the first round of Single Crochet.

Click on the photo for an enlarged view.
Once I finished the first round of Single Crochet, I gingerly removed my little valentine from the safety of the loom. And, once I secured the ends of both the floral wire and edging threads, I closed the first round of Single Crochet with a Slip Stitch, and then crocheted a second round of Single Crochet. 

And no. I did not increase the number of stitches in the second round. I did not need to, and it lays perfectly flat.

With the weaving finally off the loom, and all of the little wisps and tails of yarns and threads were snipped and/or tucked away, I went about placing and adding my decorative wire and beadwork. 


Though the handspun yarn idea had been scraped, I hadn't gotten around to unstringing the beads.  With one audition of placement, I went about hand stitching them into place.


Something that is specifically unique to this project [and this will look somewhat out of order because, again, I do not have a separate photo], is my decision to back this weaving with a piece of unbleached muslin. It is by no means a necessary step.  But, it gives the piece a neatly finished appearance.  Nice too, if what you actually want is to give it away. 

One thing that made this step easier to accomplish was using a Temporary Spray Adhesive.  It's the same premise, or trick if you will, that Quilters use to hold the layers of a quilt in place while they hand baste together the quilt back, batting, and quilt top. 

For a pattern, I simply traced around the outer edge of the loom, on top of a piece of muslin and then cut.  All I had to do next was needle-turn the edges, and whip stitch into place. Using the backside of the SC stitches, made for evenly-spaced stitching.


NOW--- Let's talk about how that lace ruffle got attached!
____________________________________________________

Running a gathering thread through the finished edge of a length of 5/8" lace, and then hand-stitching the lightly-gathered ruffle into place was a bit time-consuming, yes; but--- this was the part of the project that fulfilled my desire for a Victorianesque Valentine.


The second thing I had in the back of my mind, creatively-speaking, was the memory of a shoe boxes---with delivery slots cut in their lids. You remember? Those elementary mail boxes covered with tissue and/or construction papers, and decorated with all manner of valentines, flowers, cupids, and/or cartoon characters, crafted for an old-school Valentine Exchange?  Remember those?

That said---

Knowing from the start this would be a wall hanging, I went looking through my Findings Boxes for something that would work as hardware.

 
Again, not a necessary step.  You could just as easily pull some handspun or specialty yarn through the crochet work. Making sure, at very least, to snag the Encased Wire for stability.

I had a Satin and Pearl Braided Cording that I pulled into the initial project stash, but ended up not using it in the weaving itself.  For me it then became a must to use it for the hanger.

I had also pulled a length of Beaded Satin Ribbon [again, thinking I'd weave with it--and ended up not doing so], and that made for the perfect way to hide the cut ends of the hanger cord.  A bit of handiwork whip-stitching it all in place.  But, I really like the overall look.
 
 
After that, it was time for the true finishing touch. 
 
While it is not at all what I initially envisioned, I really wanted to include the rest of the Beaded Ribbon. So--- I fashioned a bow and stitched it into place. And, as with all things--one thing leading to another---  Voilà!
 
The carved Cinnabar Focal Bead was the final design element.  The Swan is a significant Totem. One that goes well with a day professed to honor Love.
 
I hope you have enjoyed this overview. I loved everything about this project, and want to say a special, "Thank You!" to Arlene Thayer, for inspiring me thusly. 
 
May you come away from this post equally inspired, and ready for next year's exchange of valentines.
 
For more Circular Weaving inspiration, come visit us in the Circle Weaving Group, on Facebook.  It is still a Public Group, so you are most welcome to Join. So, stop by and say, "Hello!"
   
 _____________________________________________

What's Next? 

My Weaving Spool Rack.

I'm going to share a little project I pulled together last year, what involved power tools, sanding blocks, eye screws, wood finishing--- and barbecue skewers.  Yeah, that's right!  Skewers. (~:


And--- Remember the Warp Speed Challenge? 
Well, I'm pulling together the photos for a series of posts for my 
Rag Bag Tote ProjectSo far I've designated eight distinct parts:
 Part One: Overview, Draft, and Flap

 Part Two: The Sides and Bottom Strap
 Part Three: Warping Two Looms
 Part Four: Securing the Handles
 Part Five: Weaving Semi-Round
 Part Six: Construction Zone
 Part Seven: To Line or Not to Line
 Part Eight: Finishing Touches


While this project was a lot of work, it can be as busy or as simple as you want it to be. There is some Dimensional Weaving involved, and I'm really looking forward to sharing this with everyone.  And, I admit.  It's rather important to me, since I want to show that you CAN weave dimensionally using circular knitting looms.

Until then, I've other weavings in the works.  More on those later.
 
 
http://heartsongstudio2.blogspot.com/2016/02/services-rendered-wish-list.html
__________________________________________
Leave any questions you may have in the Comments. 
Or Facebook Friends can Private Message me.
 
Follow me to, HeartSong Studio
Bye for now, and Blessings~
And Happy Weaving!