Showing posts with label Circular Weaving. Show all posts

Friday, March 11, 2016

Spring Weaving Challenge

Sculpture by Spence Byles
Periodically, different members of the Circle Weaving group[on Facebook], share images they find that--in one way or another--inspire us all. Whether any of those images end up breathing life into something we each of us create--- Who can say.

Recently, I shared this photo from a Circles in Nature search result [Article by Laura Caseley], and for the same reason--- hoping to Inspire.

As I studied the sculpture--drawn to the beauty and esthetics, due to my love of Nature--lyrics of a very old song [The Windmills of Your Mind, by Dusty Springfield], echoed through my mind:
"... like a circle in a spiral, like a wheel within a wheel---Never ending or beginning on an ever spinning reel."
Just a little while later I thought that maybe--- maybe this might make for an excellent Group Challenge. Yes? No? Yes?

So-o-o-o,
~~~~~~~~~~~~~~~~~~~~~~~~~~~~~~~~~~~~~~~~~~
Who is Up for a Challenge?
 ~~~~~~~~~~~~~~~~~~~~~~~~~~~~~~~~~~~~~~
Your Who? What? Where? When? Rules
Who?

Open to all Weavers. Young and Old. Seasoned or New. 
Please feel free to Share it Forward!

What?

Each finished Circle Weaving must contain 3 circles. Each somehow set inside the other, similar to the inspirational photo above [think also-- Droste Effect (though--- no Spiral is required!)], so that there are three separate weaving surfaces.

What materials you choose to use for your three rings are entirely up to you. They do not necessarily need to reflect Nature.  It's however the above photograph/sculpture inspired You.

Where?

When your Circles-within-a-Circle Weaving is complete, share your best photo [and include the hashtag #SpringWeavingChallenge2016 in your post] on the Spring Weaving Challenge Event page in the Circle Weaving Group.


Special Note: If you do not already belong,
please click to Join us in the Circle Weaving group.
And--- Please click Like [If you haven't already done so], on the 
HeartSong Studio Community Page [the sponsor of this Challenge].

When?

Comment on this blog post [before heading over the Event Page] that you are Accepting the Challenge, and then you have until the end of May to create and post your entries, accordingly.

Prize?

Well, let's see---- Aside from Bragging Rights!? (~: I am not sure just yet. We've got some time to figure out all of that; But--- I do have ONE idea for a Drawing.  

I will collect all the photos for a HeartSong Studio #SpringWeavingChallengeFollowUp Gallery blog post. So, one Watermarked [for your protection] photo will be required. Details to follow.

~~~~~~~~~~~~~~~~~~~~~~~~~~~~~~~~~~~~~~~~~~
Until then--- ? 
Here is a little Mood Music to whet you appetite.


~~~~~~~~~~~~~~~~~~~~~~~~~~~~~~~~~~~~~~~~~~
Let the Inspiration and the Circle Weaving BEGIN!
__________________________________________
Leave any questions you may have in the Comments.
Or Facebook Friends can Private Message me.

Follow me to my Facebook Community/Studio Page @ HeartSong Studio
Bye for now, and Blessings~
And Happy Weaving!


Monday, February 22, 2016

Weaving Upon Circular and Round Looms


Those of you familiar with this blog know that my Journey into Circle Weaving started on a Provo Knifty Knitter Loom.  A good 2 years ago, I purchased a 12" round wooden picture frame. Quite some time later, when I was able to squeeze it into my budget, I picked up a small box of brass finishing nails. This past Autumn--- while it took me a few weeks to accomplish, I hammered in a good many of those little nails, to craft myself a finer gauge Circle Weaving Loom.

While I have a little bit of hand spinning I wish to finish up first, this is likely the next loom upon which I will weave.  There's a Four Seasons theme that's been mulling in my brain. And, I've got a new idea for some bead work on this project, with which I am dying to play.

Suzy Brown's Old Drum Carder Gear
While weaving in the round, circle weaving, or circular weaving [however you wish to define it] is [as I stated a few years back in Leading the Way] nothing new [though many of us can say Suzy Brown (WoolWench Handspun Yarn), breathed new life to into the craft]---some of the looms upon which we can needle weave, definitely are. 

Weavers Young and Old, New and Seasoned, are finding many ways to enjoy this more specialized weaving passion, whether by Metal Craft Rings; CDs; Pizza Box Lids; Hula Hoops;  Wilton Cake Rounds; Embroidery Hoops; Wire Wreath Frames; Bicycle Wheels and Other Parts; or pretty much anything round.

The focus of this post, is to share and link you to the many commercial and/or independently designed looms that are available to us these days. While a few looms listed below are more specialized [for the weaving of tams/berets] others simply reflect charm, artistic flare and/or a simple preference of design. Enjoy!
~~~~~~~~~~~~~~~~~~~~~~~~~~~~~~~~~~~~~~~~~~~~~~~~~
Circle Loom, by Rodier Creations


Circular Loom, by Majacraft
 
 
Métier à tisser circulaire [Circular Loom, this is a French site], by LE GEANT DES BEAUX-ARTS 


Métier à tisser circulaire [Circular Loom, this is a French site], by le petit Maunel


Círculo Telar [Circle Weaving Loom, this is a Spanish site], by Hilokune - Estudio Logaro


Tissage Circulaire [Circular Weaving, this is a French site], by Atelier des Bruyeres


Circular Weaving Loom, by Seven Yaks


Circular Loom in Wood, by Gluckskafer and Natural Mom Gear

 
Circle Weaving Looms, by Twill Textile Designs


Grimm's Circular Weaving Frame, by Bella Luna Toys


KK Replacement Looms, by CinDWood Crafts

http://www.cindwoodlooms.com/product/large-round-afghan-loom/
 
Knitting Looms, by Cottage Looms


Kumihimo Disc, by Katerina Collection


Large Circular Weaving Frame, by The Wooden Wagon


Round Knitting Looms, by Boye, Provo, Knifty Knitter, Knit Quick, Martha Stewart, etc.

 
Round Looms [South Africa], by Vaalcraft
 
 
Round Knitting Looms, by The Loom Room
 

Round Weaving Looms, by The Unusual Pear


Weave-a-Round, by Wild Hare Fiber Studio


Weaving Loom, by Quirky Bits-n-Pieces


Wee Looms, by Janda Multimedia

 
Métier à tisser de roué [Wheel Loom, this is a French site], by Felaine
 
Special Note: I could not find a merchandising page or link,
and have a query in regarding any potential purchasing info for this loom.

 
Wooden Loom, by Anastasia Bagena Arxontaki [this is a Greek page], and GAwoodenloom 
 
~~~~~~~~~~~~~~~~~~~~~~~~~~~~~~~~~~~~~~~~~~~~~~~~~
SPECIAL NOTE: If you are an Independent Craftsperson, a designer of a new loom for Circle Weaving--- someone whose work I have yet to see, you are invited to provide a link to your product in the Comments.
~~~~~~~~~~~~~~~~~~~~~~~~~~~~~~~~~~~~~~~~~~~~~~~~~
Book-related Circle Weaving Resources
 
Weaving Off-Loom [Chapters 5 & 6], by Dona Z. Meilach (Author), Lee Erlin Snow (Author)
 
http://www.amazon.com/Weaving-off-Loom-Dona-Z-Meilach/dp/0809289229/ref=sr_1_1?s=books&ie=UTF8&qid=1456155850&sr=1-1&keywords=off+loom+weaving


The Technique of Teneriffe Lace by Alexandra Stillwell (PDF Download)
 

Teneriffe Lace : designs and instructions Cornell University Library (Books Online)


~~~~~~~~~~~~~~~~~~~~~~~~~~~~~~~~~~~~~~~~~~~~~~~~~
Online Resources
 
HeartSong Studio Tutorials and Projects for weaving on Knitting Looms by Laura Abbott [BlogTalkRadio]
Majacraft Resources Check the links for Tutorials for free Downloads, and Videos for helpful Warping and Weaving information by Suzy Brown.
~~~~~~~~~~~~~~~~~~~~~~~~~~~~~~~~~~~~~

And, as always, you are more than welcome to join the well-over 1800 members of the Facebook Circle Weaving Group.  You will find a multitude of styles, experience, how-to's, and inspiration.  This group resulted from the very popular, and flagship course of the, FiberyGoodness Spinning Courses, and was launched by Suzy Brown [WoolWench Handspun Yarn]Andrew Poad [Majacraft], and Arlene Thayer [Spin Artiste].
Plus, you are more than welcome to visit me on Pinterest and see the many different styles and examples of Circular Weaving; from all around the world.
~~~~~~~~~~~~~~~~~~~~~~~~~~~~~~~~~~~~~~~~~~~~~~~~~
 http://heartsongstudio2.blogspot.com/2016/02/services-rendered-wish-list.html
__________________________________________
What's Next?

I'm drafting out a All-in-One HeartSong Studio Resource List. And, I am working on completing a few posts that have been sitting way too long in the Draft Folder. Until then,
__________________________________________
Leave any questions you may have in the Comments.
Or Facebook Friends can Private Message me.

Follow me to my Facebook Community/Studio Page @ HeartSong Studio
Bye for now, and Blessings~
And Happy Weaving!


Thursday, June 18, 2015

A Garden Pouch

 
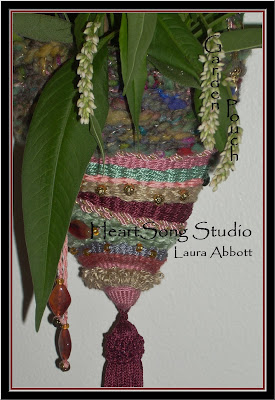
For this project I used the Provo loom with 41 pegs.
I warped this piece utilizing 9 pegs top and bottom.
 
Since I knew this would not be a total Weft Faced Weave, I chose a coordinating crochet thread, But--- because it was so lightweight, I doubled the warping.
 
This ended up working in my favor when I chose to split out the threads at one point.
  
 
*If a picture is all you need click on the image above for a Slide Show
  
 
I had two specific handspun yarns that I wanted to use for this project.  One traditionally spun yarn.  The other was my first attempt at an Art Yarn. And I was really looking for the opportunity to showcase this skein. 
 
This makes for an excellent Stash Buster project, as well as for unraveled, repurposed, and/or rescued yarns.  Silk ribbons and Braided Cordings.
 
I worked with two rescued yarns.  An old chenille yarn. And an even older [almost vintage] Linen yarn. 
______________________________________________
Warping Tutorial
 
 
I have tried to maintain a creative balance in my posts here, between providing Novices the instructions they need, and letting the more experienced weavers scroll on through in Overview Mode.  [The Slide Show option.] 
 
That said, the first series of photos in this post, is specific to warping up your circular knitting loom.
 
Below are two versions. 
 
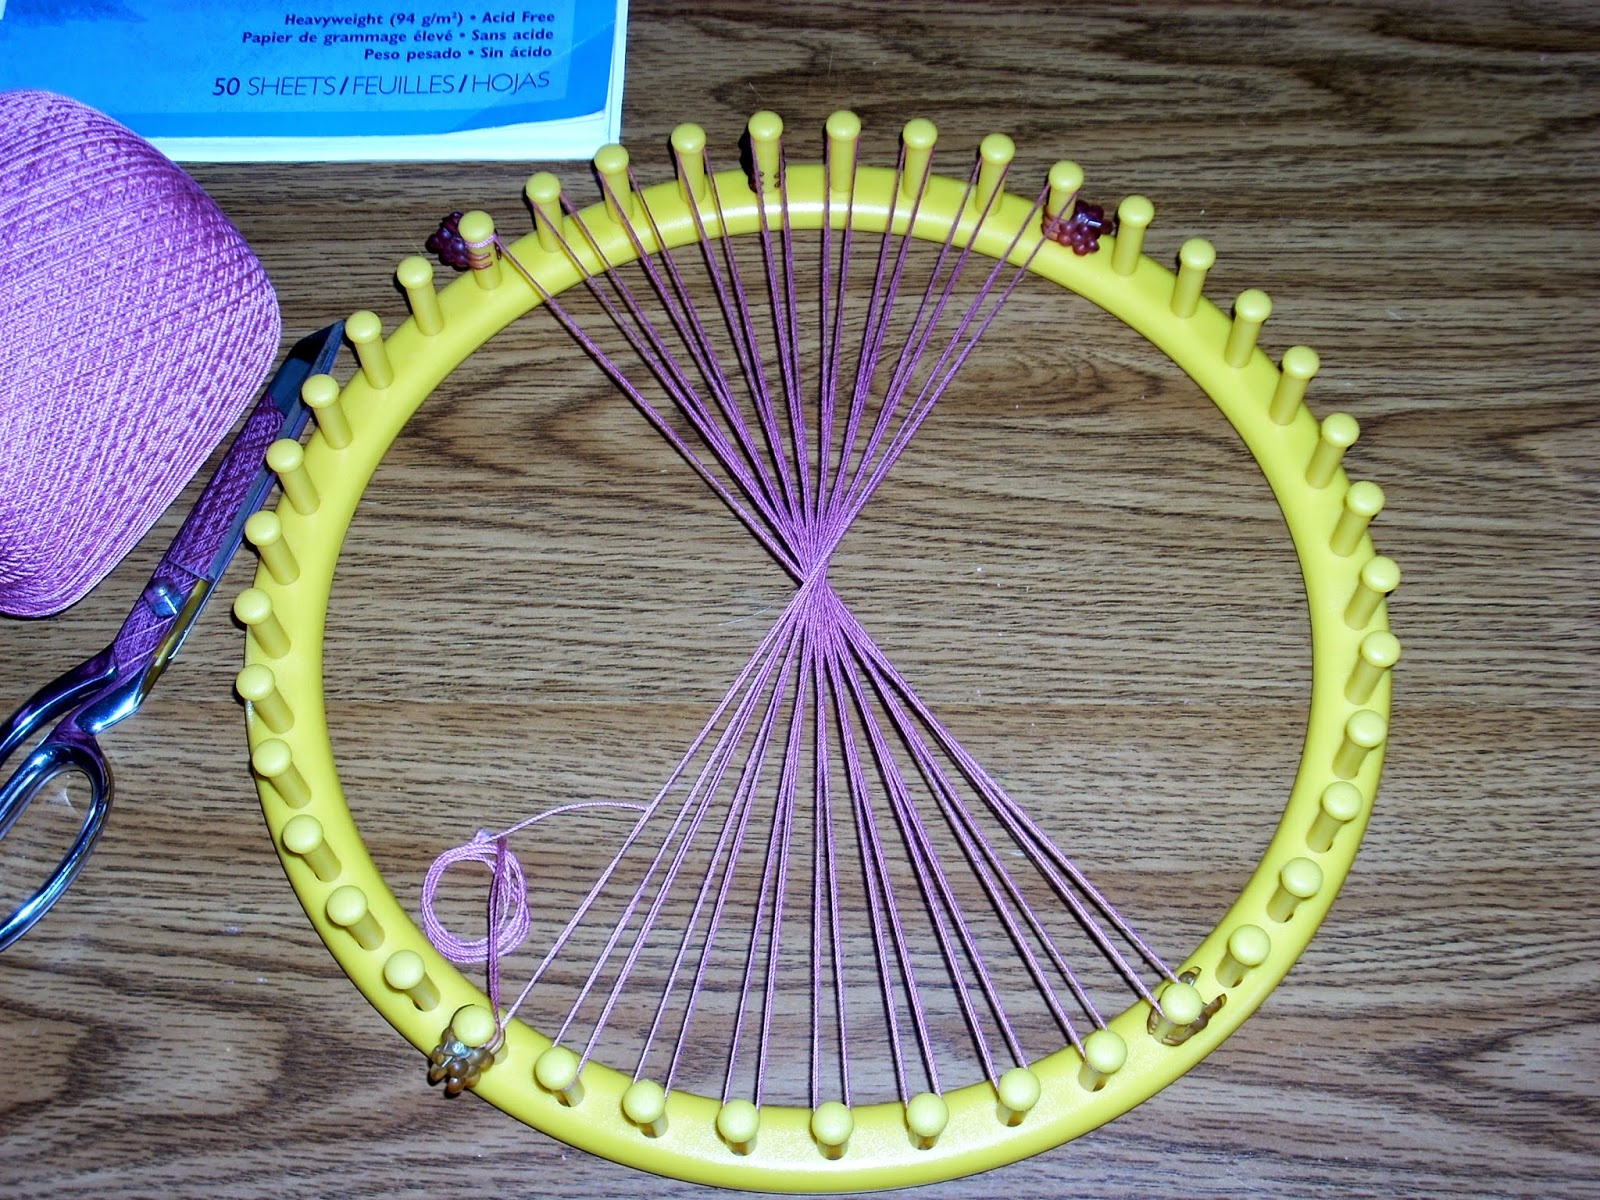
The first being from a photo of the original warping; which, due to the choice of Crochet Thread, I doubled for strength and better stability.  
 
The second being a re-warping; for the purpose of this tutorial, using a cotton yarn simply for a more standard warping. [As Circle Weaving goes....]
 
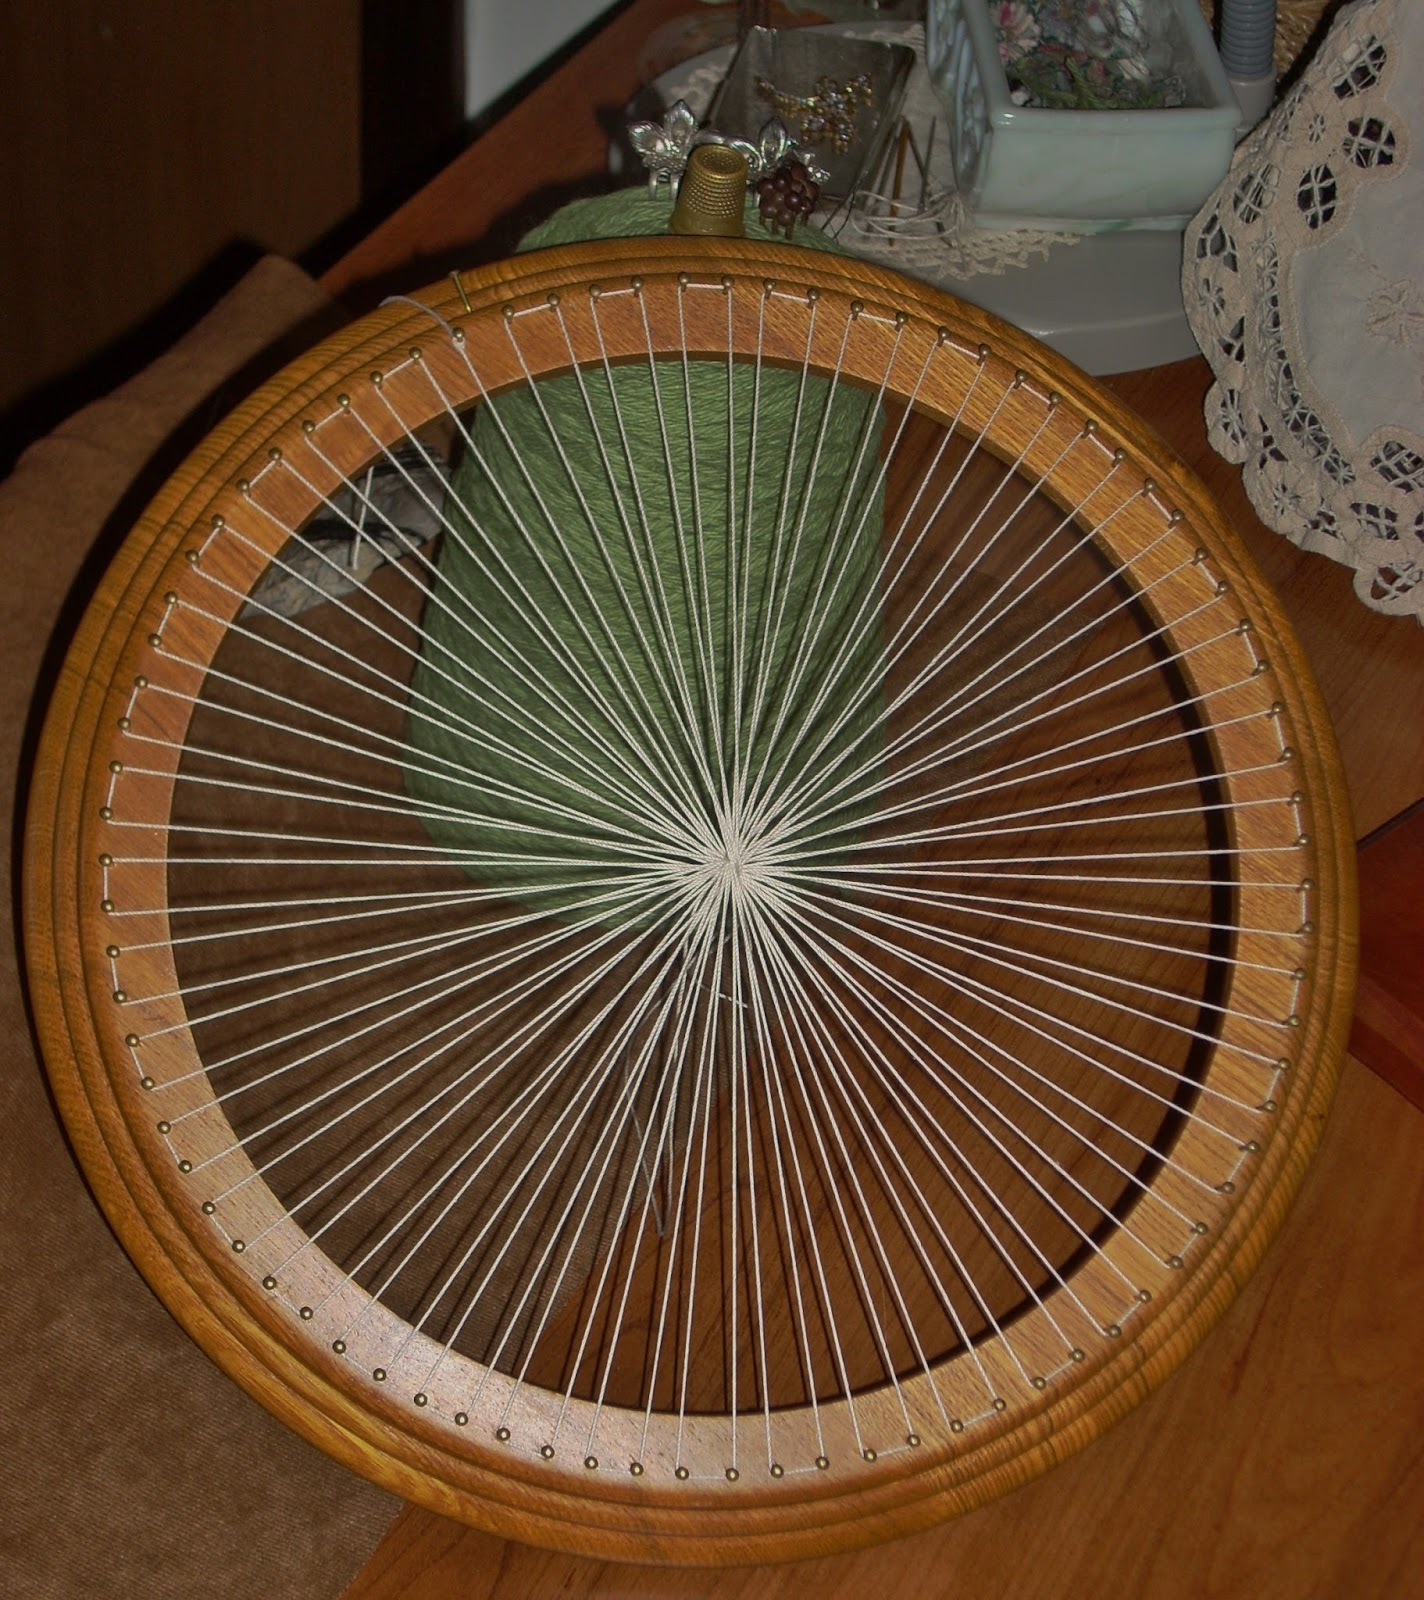
For this project, I counted out the pegs [See Example #1 & Example #2] both to the Left and Right from the Center and Anchor Pegs.
 
Example #1
SPECIAL NOTE: For a larger view of individual photos:
Right Click on a photo and chose either
Open link in new tab --or-- Open link in new window

 
The warping is for 9 pegs; both Top and Bottom.

______________________________________________
Re-Warping Graphic Images
 
Same warping, same numbered pegs.
 
I'm providing both examples---
 
Example #1 has all the used [warped] pegs numbered.
 
Example #2 is more for knowing your width, and where you want to Tie On and Tie Off. 
 
Special Note: You may want your pouch narrower.
Or--- a different manufacturer might be a finer gauge of pegs;
and you may need to include more, i.e. 11 or 12 pegs--Top and Bottom.
 
Example #2

 
The wedge below, is the pattern I cut to determine the size of my finished project.
 
The small hair clips pictured, I use to mark overall size, along with start and stop points, i.e. where to Tie On and Tie Off, etc.

To start--- 
 
Tie On at peg L4
Run the Warp Thread down to the right side of peg R17
 
 
Run the Warp Thread around R17 and then back up to the left side of L3
 
Run the Warp Thread back down to the right side of R18 and then back up to L2

Keep it going,
 
 
and then Tie Off on peg L16

 
Below is a close up of the Intersecting Center Threads.

 
Turn your loom over now, to view of the back side.
 
At this point, cut a scrap piece of yarn to secure the Center Threads.
 
This is temporary, as it will be removed once your weaving is complete.
 
 
Tie a basic Square Knot.

 
You are now ready to weave.

 
This is a good place for the Bouillon Stitch [or Round]; to help even out the Warp Threads.
 
The next few graphics show the basic weave.
 
Think embroidery. Think: Stem Stitch; somewhat in reverse. 
Meaning, the stitch [though Stem Stitch in nature] 
progresses from the Right to the Left. 
 
 
First Row---

Second Row---

______________________________________________
Back to the Original Weaving 
 
From this point on, this will be more of an Overview of the project.
 
This is what I did.  The possibilities are endless.
 
 
What I call the Bouillon Round is 7 or 8 rows.
 
You can determine your own count, should you even choose to use this weave.


And, since the back is not going to be seen, there is no harm in simply running your Weft Thread--once you are at the end of the row--back to the start point.
 
Special Note: You CAN weave it back the opposite direction
--weave the 'return' row from Left to Right--but,
you will get an entirely different look. The Loops have a different lay to them.
 
Starting each row from the right though, gives a nice little pocket on the back side to run cut ends through.
 
Below is the weaving from the opposite side.


You can determine the shape and height you want.


Again, hair clips are also quite useful in temporarily securing cut ends.
 
 
I decided I wanted to experiment more with my custom-hammered hook and Pibiones Weaving.
One of my next blog posts with highlight more
of this technique---specific to Circle Weaving.


SPECIAL NOTE: I will edit in a link when I update the relevant [pending] blog post.


From this point on, I worked more Freeform; alternating Textures, Cording, Yarns and Threads, etc. 


My Worktable at HeartSong Studio.


You will notice it was here in my weaving, that I decided to utilize the doubled warping for a finer weave. Just another advantage to doubling up on the warp---depending on the thread you use. 
 
________________________________________________________
In the Home Stretch
 
(((YAY))) Well, weaving-wise, anyway.
 
There was a fair amount of work tucking and weaving in the ends.  And the cut ends of the decorative cordings needed to be whip-stitched into place.
  
 
But, I was at very least, ready to prep this piece for removing it from the loom.
 
 
Running a thread around the outer edge, and through the Warp Loops, helps to give you a little something more substantial to work with, in regards to creating a crocheted border.


Pinned together at the top edge [below], this was the time to audition how it would look---
 
Plus, I wanted to do a little Ribbon and Bead work prior to adhering the lining, and stitching up the sides.


Knowing this was going to hold cut flowers, I did not want stems poking through the weave. I say this, because I also see this for holding dried flowers.
 
I cut two pieces of craft felt and used a temporary spray adhesive [similar to how some Quilters use it to sandwich a quilt top and back with the batting], to hold the lining in place.
 
 
At this point, I was ready to whip stitch the sides.


One side stitched together---


Both sides stitched.
 
 
View of the felt lining, and pouch pocket.


I was now ready to crochet the finished edging.
 
 
_________________________________________
 
HEARTSONG STUDIO TIP:
 
But first--- this is a tip that I shared a little while back, on Facebook.
 
I use a Sleeve Pressing Board to help bring any given handwork up and off of the table top, and a little closer to view.
 
Since it is quite well used [it has suffered its share of scorch marks over the many years of use],
I cover it with decorative napkin.
 
Using this helps with the issues of my Back, and with the days when my vision is more blurred than others.  It also brings the work closer without needing to be entirely handheld; which can aggravate my Carpal Tunnel.


I used some old Necklace Hooks, that I had in my Findings Stash, to connect the hanger to the pouch.


I didn't have any floral oasis on hand at the time [I still don't!], but this old trick works in a pinch.
 
 
 ______________________________________________
Gallery


https://www.facebook.com/HeartSongStudio2014
Click on the graphic to join me on Facebook!
___________________________________________
What's Next?
While I want to say, I need to think on that.... It will, in all likelihood, be a follow-up to this this post, as regards the Pibiones Weave.

That said, I also am considering a quick overview of the recent Paper Yarn that I spun for the Tour de Fleece.
 
http://www.amazon.com/gp/registry/wishlist/O4KUJMXVGI29/ref=topnav_lists_3
___________________________________________
Leave any questions you may have in the Comments.
Or Facebook Friends can Private Message me.

Follow me to my Facebook Community Page @ HeartSong Studio
Bye for now, and Blessings~
And Happy Weaving!